Morris Minor - door handles
Symptoms of problem : Driver's door handle lost its 'spring' - rattling around.
Vehicle : 1957 Morris Minor 1000 Pick-up (LCV) - a CKD MM built in Petone, New Zealand. (part Series II, part Minor 1000 I think!)
Time : 2 hours Difficulty : 4/10 Parts required : New or secondhand door handle Cost : approx. £15 for secondhand door handle
Special tools required : Nil
Replacing a door handle took me longer than expected - the most difficult part was replacing the lock barrel so that the driver's door could be locked with the original key - this step will obviously not be needed for doors which don't have an external locking capability.
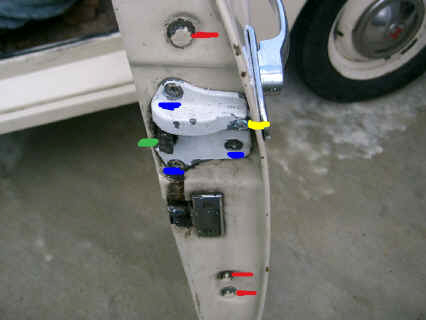
Removal of old handle : There are several bolts and screws which must be removed before the old handle can be removed. The chromium-plated handle is connected to an end plate (painted white in the above photo) - they are removed and replaced together as one unit. First remove the window winder, interior door handle, door pull strap and the interior door panel. Remove the screw marked with yellow in the photo above - this allows the chrome-plated outer trim plate which is under the handle on the outside of the door to be removed.
Next remove the 3 screws marked with blue in the photo above. Note that they are different lengths - the top one is the shortest, the RH one is the middle-length and the lower LH one has the longest thread. The handle should now be loose, but cannot be withdrawn yet.
Before the handle can be removed (via the hole in the door edge) the vertical window channel and the door latch mechanism (marked with green above) must be moved out of the way, to allow the handle to be extracted through the hole. To move the vertical window channel out of the way, remove the 3 bolts marked with red above, then undo the 2 small Phillips-head screws which are at the rear of the top of the window frame - some vehicles have stainless-steel window frames and stainless-steel screws which are easier to remove. The vertical window channel should now be free to move (don't try to extract it, just make sure it is free to move behind the handle mechanism) To remove the door latch mechanism, undo the 2 large Phillips-head bolts which secure the mechanism at the rear inside the door - then, working through the hole in the inside skin of the door, lever the mechanism down just far enough for the latch to move about 2" down inside the door edge - the handle assembly should now have enough space to clear the door and be removed.
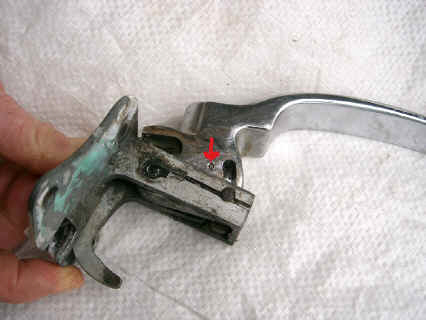
Removal/replacement of lock barrel : If you want to use the same key for locking, you will need to fit the old lock barrel to the new handle. The lock barrel (see photo below) will have 4 or 5 'tumblers' which are all flush with the cylindrical body when the correct key is inserted, allowing the lock barrel to turn and unlock the door. The lock barrel is held in place by a single small metal pin, which can only be removed after the handle assembly has been removed from the vehicle. The end of this small pin can be seen (arrowed) on the underside of the handle assembly in the photo below :-
 Driver's door handle seen from below
The lock barrel securing pin is driven out by striking it from above with a suitable 'drift' - I used a piece of hardened steel rod about 1.5mm in diameter - a small thin steel nail with the end cut-off/flattened would be OK. The lower end of the securing pin (the end towards you in the photo above) has splines, so the pin must be re-inserted from below, with the splines last to go into the hole. Note - there is very little clearance to get at the top of the pin, so you will need a helper to hold the handle under tension while you strike the top of the pin.
 Lock barrel + securing pin removed from handle
Installation of new handle : The replacement handle is installed by reversing the removal procedure - however there are one or two things to be careful about. Grease everything in sight - especially the spring (which broke on the old handle). Copper or graphite grease would be best, although might eventually cause the mechanism to stick ? Insert the new handle into position, but don't insert the 3 fixing screws (marked in blue) until after the latch mechanism has been gently levered back up into position and secured by the 2 screws, and the vertical window channel has been moved back into position and secured (3 bolts marked red and 2 Phillips-head screws at top) Hint - winding the window down an inch or two makes reconnecting the L-bracket at the top of the vertical channel to the top of the window frame easier.
Next, insert the 3 handle fixing screws and tighten them up - check that the new handle mechanism works correctly and can be locked and unlocked. Lastly, reposition the chrome-plated outer trim-plate and insert the fixing screw (marked in yellow above) CAUTION - do not over-tighten this fixing screw or you could crack the threaded casting part of the trim-plate.