 plastic cover over heater connections - at base of tub
Hotpoint WM62 repair page November 2009
This page describes how to replace the main drum bearings in a Hotpoint™ WM62 (or WM67) front-loading washing machine.
This is a difficult DIY job, which you should only attempt if confident you can complete it correctly and safely.
November 2009 - I did the same repair on my friend's WM67 machine - made some minor corrections.
April 2009 - Scroll to the bottom of this page for some extra useful information from Ian Beck.
Disclaimer - no responsibility is accepted for damage or injury which could be construed to result from the information given on this page. It is your responsibility to decide whether or not you are capable of carrying out this repair safely and correctly. It is your responsibility to avoid electric shock or any other personal injury. Do not attempt this repair until you have read the information below carefully and decided whether you are capable of doing the repair.
We've owned this Hotpoint™ washing machine - model WM62P (Aquarius 1000) - for about 5 years. This machine has not had a great deal of use - just normal weekly washes - it started to 'rumble' on the spin cycle about 6 months ago, an early indication that the main drum bearings were worn out and need replaced. Recently the rumbling got much louder and there was about 5-10mm up-and-down movement at the front of the drum.
There is a small sticker inside the door which tells you which model of WM62 you have - this repair was carried out on a WM62P, but I think all WM62 models are very similar. According to other websites, this bearing problem is common with these particular machines - I guess 5 years is the expected life of any washing machine nowadays !
Repair difficulty : This is a difficult repair - I would rate it out 8 out of 10 on the DIY scale. You might be lucky with the condition of the bearings etc, or you might not be lucky. Before you start, be prepared to have to buy a new washing machine if things don't work out - or more parts than listed below e.g. a new plastic tub.
Time required : This repair took me 6 hours in total.
Tools needed : Socket set, screwdrivers, 30mm (M30) hex socket, 2lb hammer, crowbar, 15" length of 5/8 hex steel bar, large Mole-grips, large engineers pliers, cold chisel, 'Plus-gas'
You will also need plenty space to work and lots of lighting.
Parts required : I ordered the following parts from CPC (prices excl. VAT as at Nov 2007) :
WG304553 (1611186) Drum spider and bearing kit (comprises 2 bearings + seal) £ 18.85
WG305164 (168172) Outer drum seal £ 3.47 (this drum seal (front), also called a tub seal, is probably not required, but worth replacing while you have everything dismantled anyway)
Lots of other washing machines seem to use this same drum spider and bearing kit.
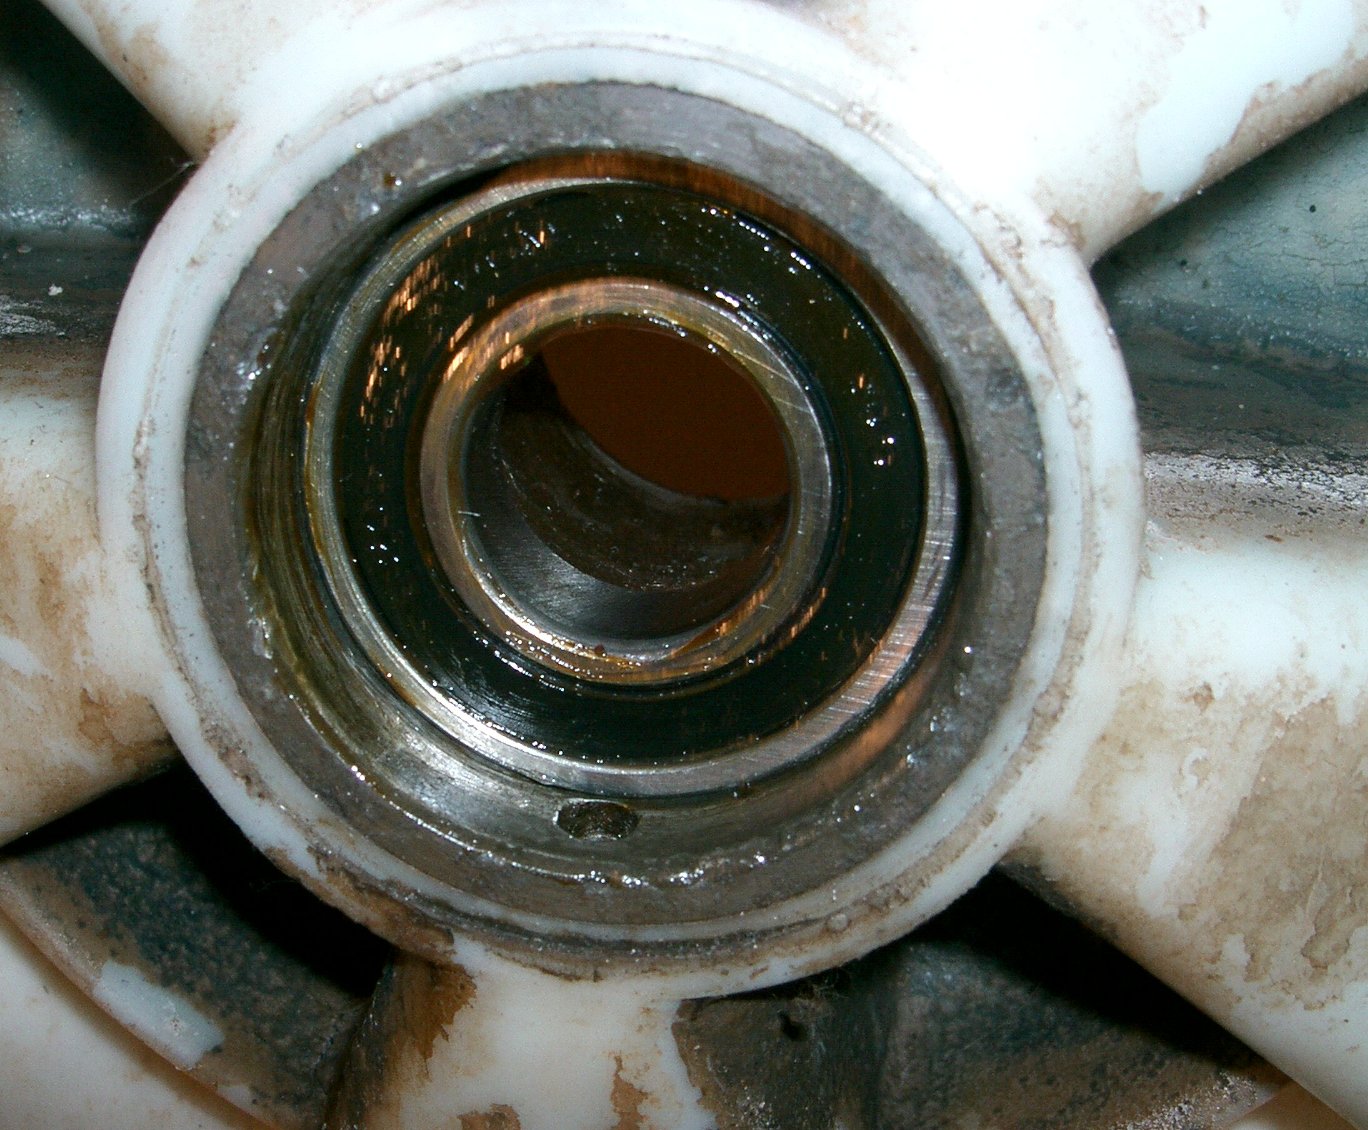
Background information : In common with most other front-loading washing machines, this model WM62P has a stainless-steel inner drum, which revolves inside a plastic 'tub'. Water is retained in this tub by the door seal at the front - the front part of this plastic tub is removable, held in by spring-metal clips, with a 'tub seal' at the join. The stainless steel drum is supported at the rear by the 3 legs of the 'drum spider' - the shaft of this drum spider passes through 2 bearings and exits the rear of the tub, where the main drive pulley is held onto the threaded end of the shaft by a very tight 30mm nut. The inner bearing (nearest to the drum) has a plastic/metal seal (like an oil-seal) mounted in front of it, which prevents water from the tub reaching either of the bearings. There is a small drain hole under the bottom of this seal - if rusty water leaks from this hole onto the floor under the machine, then this main seal is on its way out and will need replaced.
Overview of repair : The top and front of the machine, then the front of the tub are removed. At the rear, the drive-belt and pulley are then removed, allowing the drum to be extracted through the front of the machine. The seal and two bearings are then removed and replaced. It is usual to also replace the drum spider.
Click on any of the photos below to see an enlarged version.
Section 1 - Dismantling
plastic cover over heater connections - at base of tub
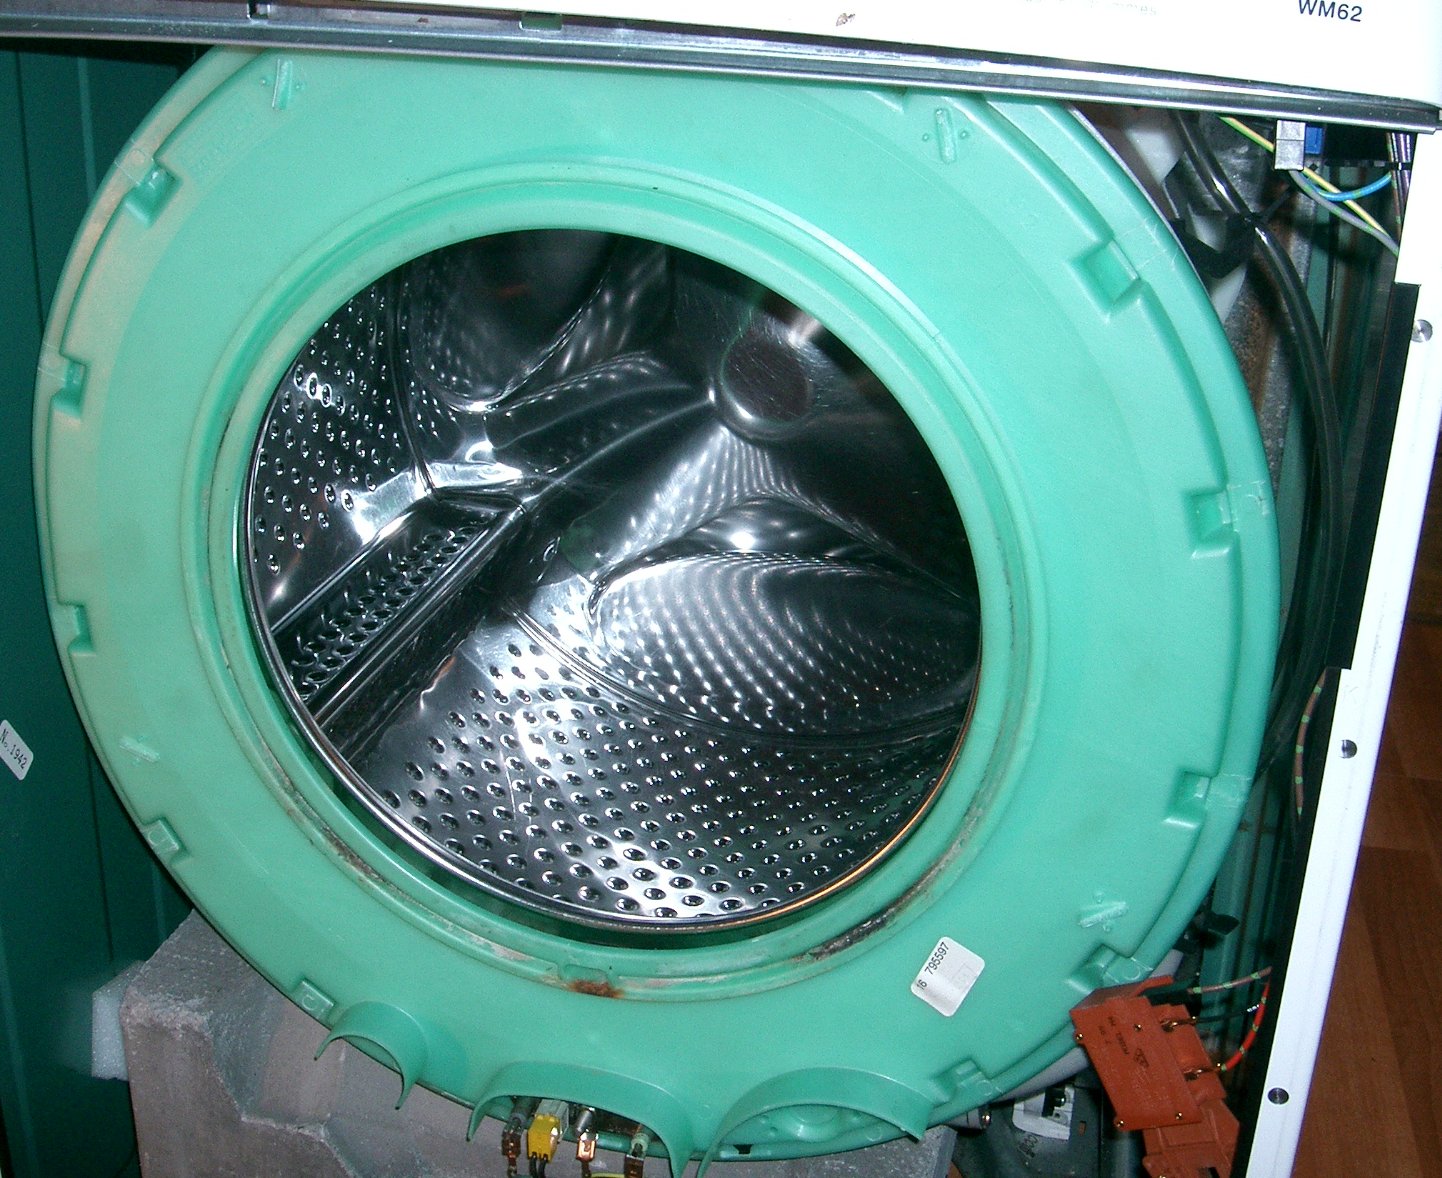 front of tub - with retaining clips removed
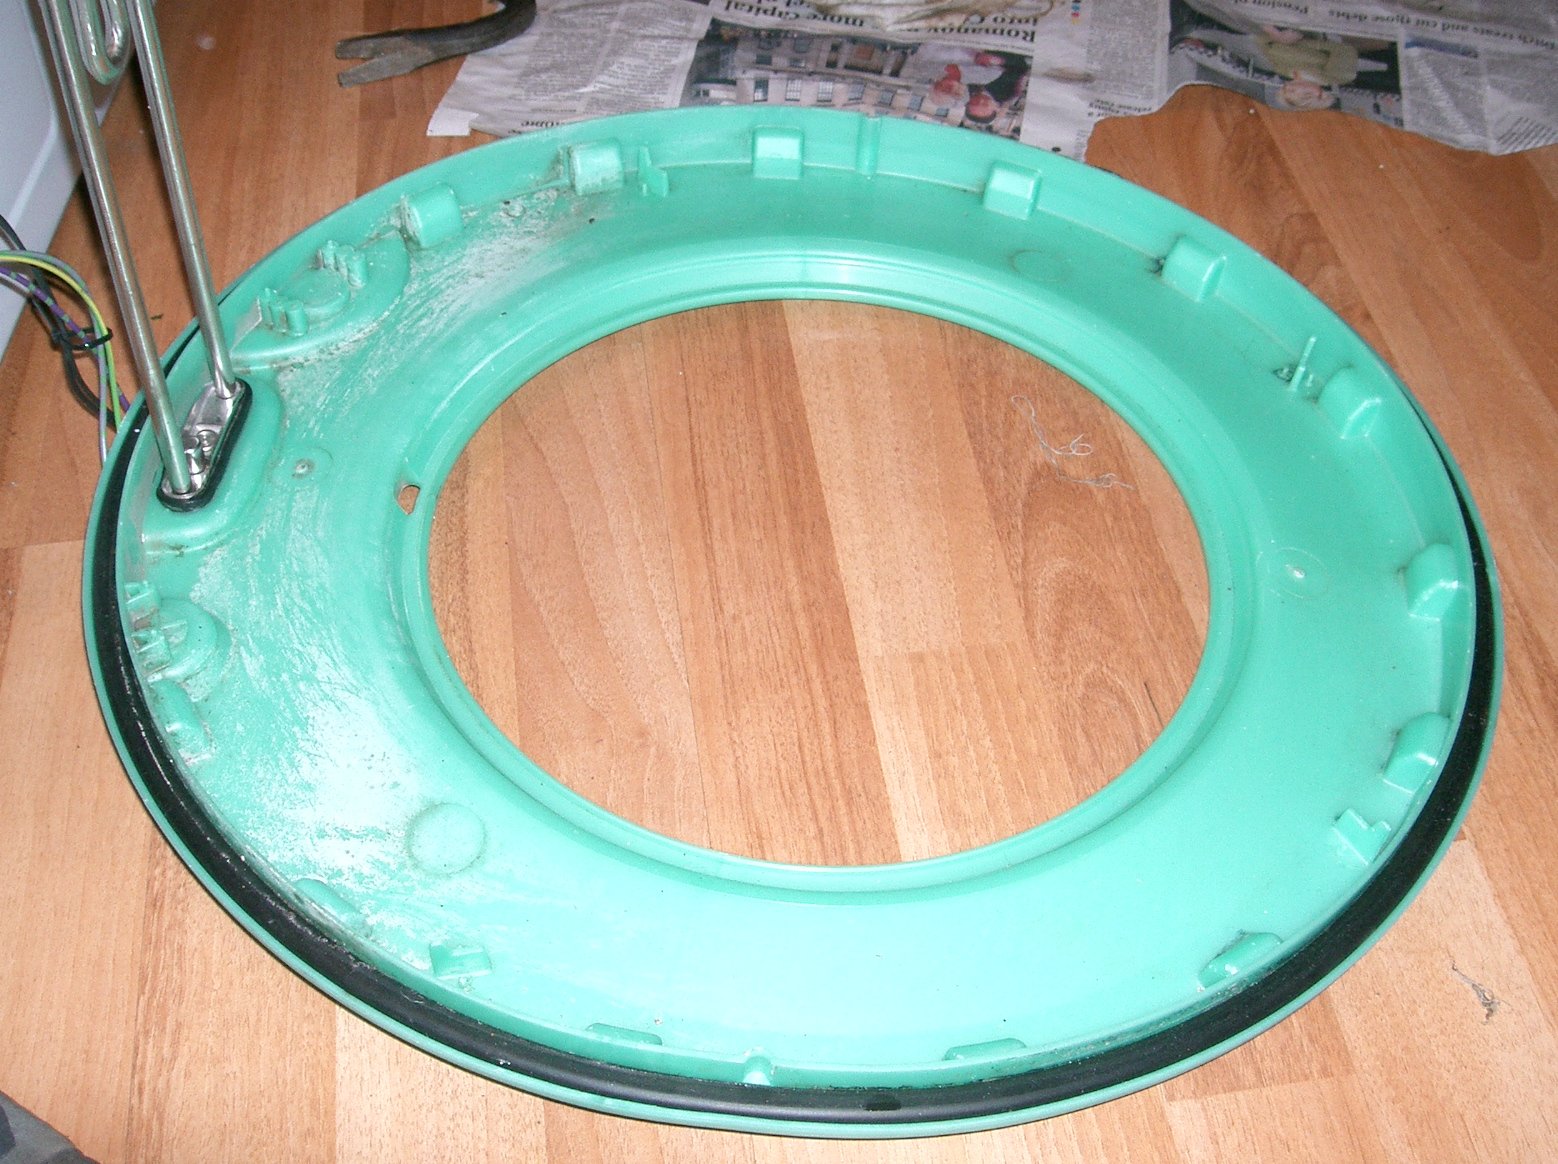 tub front removed, complete with heater - circular rubber tub seal still in
place
tub front removed, complete with heater - circular rubber tub seal still in
place
This main nut is a conventional thread - NOT A REVERSE THREAD - it is just very tight. Look at the thread on the new drum spider shaft if you need convincing !
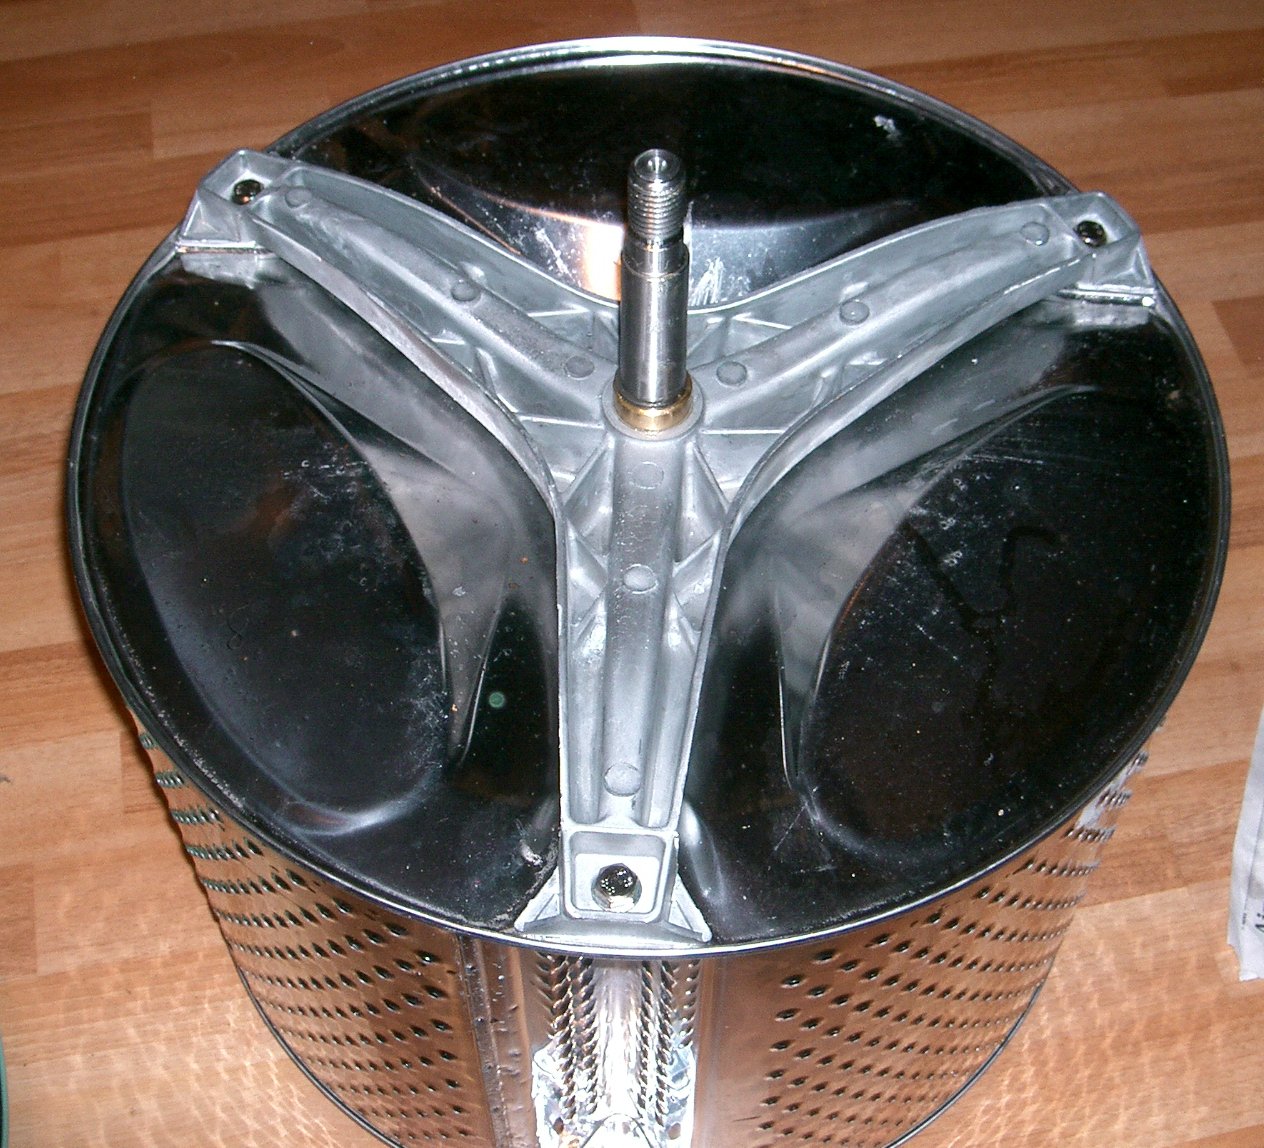
9. Remove the 30mm nut. With someone holding the drum at the front of the machine, unscrew the main pulley from the threaded end of the drum spider and lower the pulley down the back of the tub. Tap the end of the drum spider threaded shaft until the whole drum + spider comes out of the front of the machine. 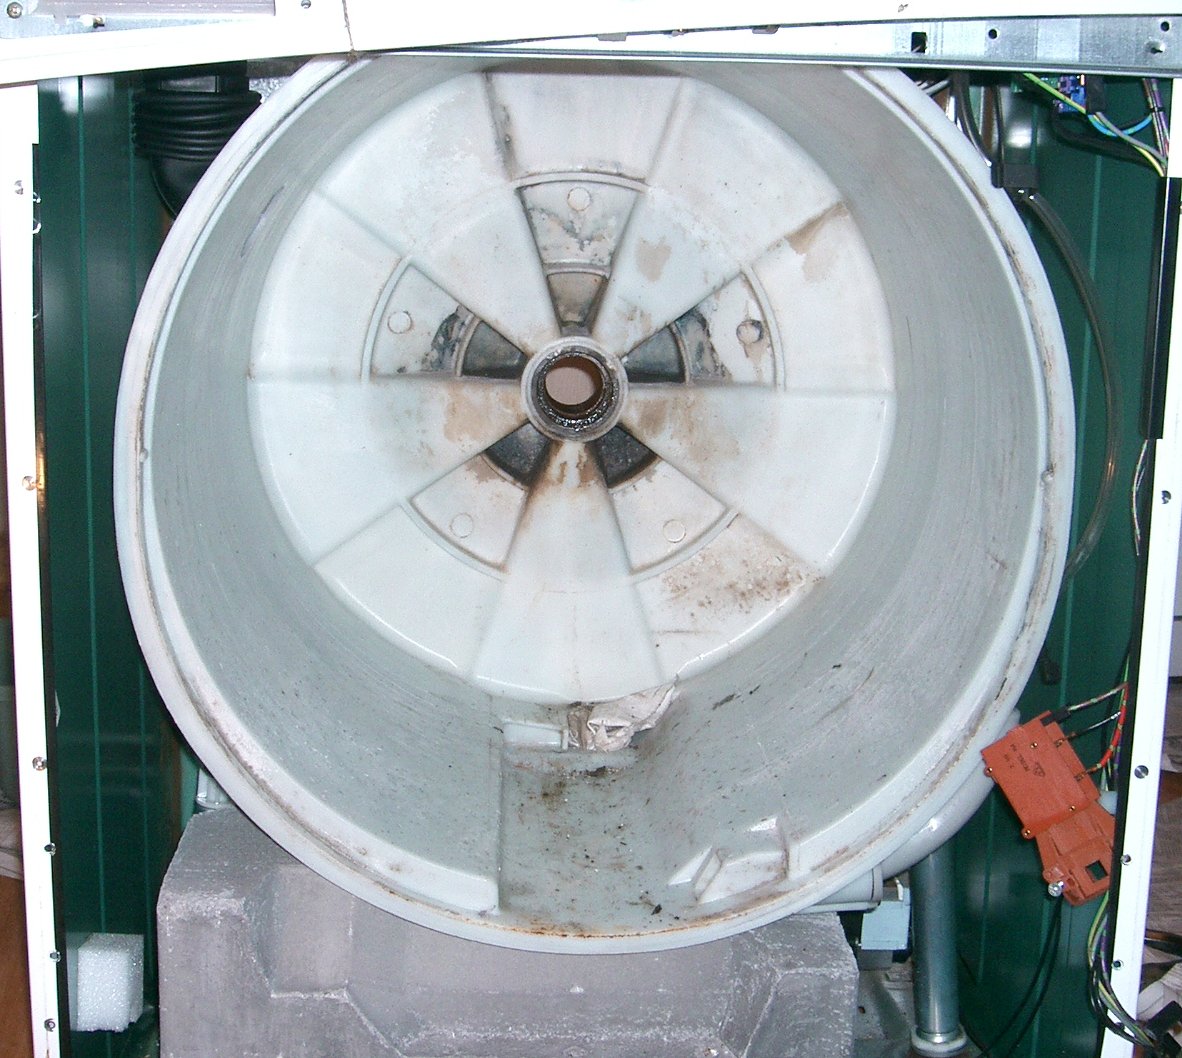 tub with drum removed - before removal of old bearings
Section 2 - Removing and replacing the bearings
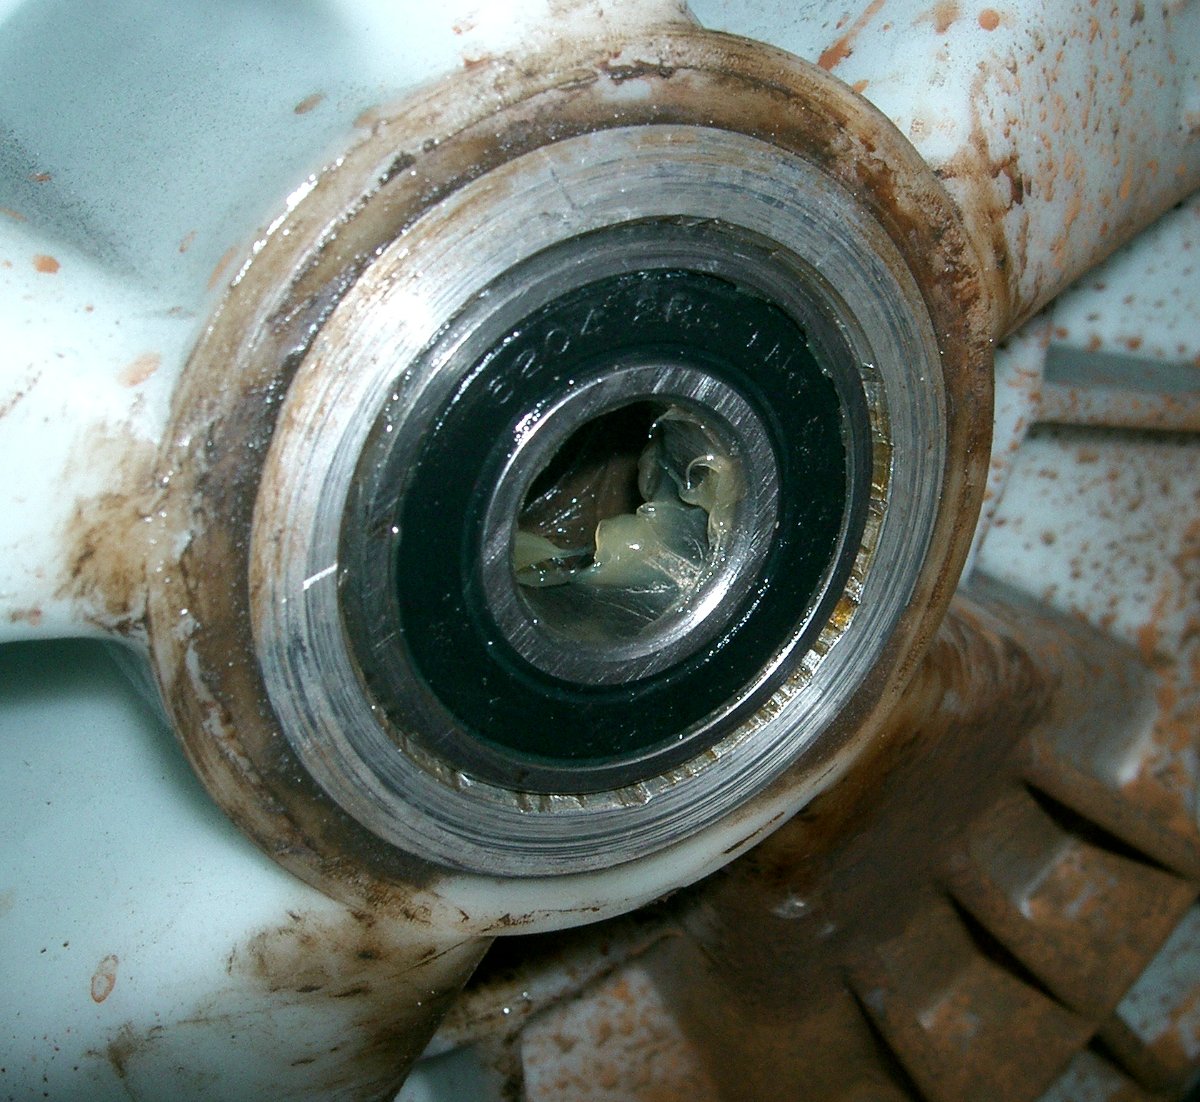
The seal and two bearings are held within a steel tube which is mounted centrally at the rear of the plastic tub. Corrosion makes these bearings difficult to remove without a special 'bearing removal tool' (cost £300), but if you are ingenious, determined and lucky, you can remove them without this special tool. The seal and front (inner) bearing are removed by driving them out towards the front of the machine, whereas the rear (outer) bearing is driven out towards the rear of the machine. Your aim is to remove the water seal and the two bearing without damaging the metal tube which retains them.
 seen from inside the tub - new front (inner) bearing in place,
before fitting seal
seen from inside the tub - new front (inner) bearing in place,
before fitting seal
 seen from the rear of machine - new rear (outer) bearing in place
6. Tap the new seal into place carefully - the flat side should be towards the front of the machine i.e. towards the drum. This flat side should be flush with the end of the steel liner sleeve when the seal is fully seated.
Section 3 - Re-assembly
Undo the three 13mm bolts holding the old spider to the drum and replace the spider with the new one (using the new bolts and special fixings supplied with the kit)
 new drum spider bolted to rear of drum
Re-assembly is the reverse of dismantling i.e. insert the new drum spider + drum into the new bearings - screw the large belt drive pulley onto the threaded shaft, then tighten the 30mm nut. WARNING - do not overtighten this 30mm nut - I made this mistake - the crowbar slipped and broke the cast metal pulley - replacement cost £33 ! If you want, put some car paint on the exposed thread as a thread locking compound, but it should not be needed. Later I discovered that the thread on the drum spider shaft is a tapered thread - you can screw the 30mm nut on by hand for about 1.5 turns then it encounters the larger thread diameter - in other words it is designed to get tight very quickly and you don't need to worry about it coming loose if you exert reasonable tightening force. The lack of a washer under the nut probably added to the overtightening problem, but I was just using too much force (with my new 3/4" drive socket set!)
Clip the front back onto the tub, taking care to use the 3 smaller clips for the 3 lowest positions near the heater element. Refit the strengthening crossbar.
Refitting the large rubber door seal was a real headache - eventually I figured out how to carefully remove the rubber seal from the front panel - there is a fragile plastic clip at the top of the door hole, which secures a thin wire loop, which in turn holds the rubber door seal onto the front of the machine. I undid this clip, removed the wire and released the rubber door seal completely from the machine front. I then installed it onto the front of the tub, tightened the circular retaining band, then refitted the front of the machine, then re-secured the rubber door seal to the front of the machine. Otherwise it seems to me almost impossible to secure the door seal correctly to the tub.
Replace the drive belt - loop it over the motor shaft, then feed in onto the main pulley while turning the pulley slowly.
Replace the top front of the machine and the top. Now is a good time to tilt the machine over and clear the filter/pipe which leads from the base of the tub to the emptying pump. Reconnect all pipework - check for leaks. Re-connect the electrical supply - do a test washing to clear out any debris or grease.
Good luck with your repair. I have no connection with Hotpoint or any repair company or individual. I have no rational explanation for spending 1 hour creating this web-page, but hope you find it useful !
Cheers - Chris Tran, Invergordon, Scotland Nov. 2007 - updated Nov. 2009
------------------------------------------------------------------------------------------------------------------------------------------------
April 2009 - extra useful information from Ian Beck - thanks Ian :
Hi Chris,
I wanted to thank you for your comprehensive bearing replacement instructions for a Hotpoint WM62 washing machine which I found on the Internet. They were a great help to me. Many thanks.
I too have just endured the process of changing the drum bearings and spider, though in my case two arms of the spider had actually fractured due to corrosion (we are in a hard water area) and it was the noise of the drum knocking against the outer tub above a certain spin speed that prompted the initial investigation.
I have made a few comments below about my experience which you may find of interest:General:
You mention that your washer was a WM62P. The P only stands for its
colour: Polar White. Our machine is a WM62N which is Sandstone colour.
This last letter is only of value if ordering coloured external parts such as
door frames or control knobs.
Repair Difficulty:
8/10 is fair - but I would have ranked it as 11/10 see below!
Time Required:
1 hour to dismantle, 1 hour to reassemble, and a whole DAY to remove the seized
inner bearing!!!! Yes, it really was a pig and I was on the point of
ordering a replacement tub when it finally decided to move.
Being an engineer I have removed many industrial motor bearings in my time but this one almost got the better of me, despite having made up a bearing removal mandrel. I eventually ended up grinding through the outer cage to release it and even then it did not want to move.
Tools needed:
I found a pair of long nosed pliers very useful too, see various references to
them below.
Parts required:
Who are CPC, have you an e-mail address for them please, for my future
reference?
I paid a lot more for my parts £29.99 for a drum spider complete with bearings (not without bearings as shown on their website) from Speedy Spares in Southampton http://www.speedyspares-appliances.com/default.asp. I have used them before and they do live up to their name.
Overview of repair:
I found it helpful to keep screws with parts as they were removed as there are
various types used, eg: the soap dispenser screws are stainless steel.
Section 1 - Dismantling
3. a) No mention of having to pull off the
programme selector knob.
b) I marked up the three cables to
the switches with coloured insulation tape and wrote details by each terminal.
Then used the long nosed pliers to ease off the push-on terminals. This
enabled me to remove the panel completely. In case I need to do this again
I subsequently use coloured heat shrink tubing to permanently mark (and
insulate) each push-on terminal.
4. Fortunately, I had fully read your instructions before starting my repair, so was able to avoid this problem by simply removing the seal retaining wire and clip as you detail in Section 3 - Reassembly - paragraph 3.
5. To access the 3 lower screws I had to prise off
the valance panel which I found to only be retained by plastic tabs.
7. As for 3b above, I marked up the heater wiring colours onto the plastic tub and used the long nosed pliers to completely remove connections to the heater terminals.
8. I just happened to have a 1 metre long 1/2" socket extension bar which worked well (previously used for tightening front wheel bearing nuts on a Montego). Holding the drum still was the major problem though, as the nut was very tight as you found too.
Section 2 - Removing and replacing bearings
2. The outer bearing came out relatively easily.
I thought that I would easily beat your 6 hours, but oh no - the best was still
to come!!!!!
3. When it became obvious that the inner bearing was not going to be quite as easy as the outer one, I decided to dismantle the bearing to avoid bits flying everywhere.
I used the long nosed pliers to pull out the retaining cage holding the balls in place, then moved all the balls together into the lower half of the bearing, which enabled the inner cage to be lifted out, then all the balls were removed.
Lots of brute force, including use of a bearing removal mandrel failed to make any impact.
I eventually ended up grinding through the old bearing's outer cage to release it and even then it did not want to move.
4. I found emery cloth useful in smoothing out inevitable damage caused by the removal debacle!
5. a) I generally use the outer cage of removed bearings as a mandrel to drive in the new bearing, until the new bearing is fully pushed into the housing, then resort to carefully using a piece of bar or cold chisel as you did. As I had ground through the cage on the old bearing, I was able to use to fully drive the new bearing home as I knew I could remove it.
b) No mention of making sure the drain hole is cleaned out and clear. Mine had got blocked with the new grease I used to aid assembly work.
Section 3 - Reassembly
General comments:
a) I changed the motor brushes too whilst the
machine was dismantled. I suggest at least checking that the brushes are
free to move in the brush boxes, as they have a habit of sticking in the carbon
dust when partially worn.
b) Prior to replacing the machine top, I had a good look around to make sure all connections to switches and the controller board were firmly in place.
I hope you find my comments of interest as we have both now shared the experience of this interesting repair!Kind Regards,
Ian Beck,
Bedford, England
Disclaimer - no responsibility is accepted for damage or injury which could be construed to result from the information given on this page. It is your responsibility to decide whether or not you are capable of carrying out this repair safely and correctly. It is your responsibility to avoid electric shock or any other personal injury. Do not attempt this repair until you have read the information above carefully and decided whether you are capable of doing the repair.